Monthly Archives: January 2012

Painting Wood Furniture

Standard

I have this friend who keeps all her old furniture in her garage. When we moved into our house, she offered to let us go shopping in her garage. I said, YES!!! I got an awesome mirror and then this hanging/hall thing. The mirror is in a white frame, matches great, so was hung up immediately. The hanging/hall thing was not the right colors, so this is how I changed that.

For this project you will need:

-sand paper

-hammer

-nails

-primer

-paint color of your choice

-drop cloth

-paint brush

-a friend to help (I had my friend Megan do it with me. So thanks Meg!)


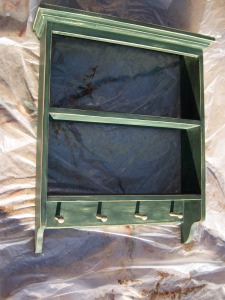
This was the hall hanging thing when I got it (forest green and maroon background):


To begin with, I knocked out the back by banging it lightly with a hammer to loosen it, then pulling out the nails. Then I sanded everything down. This is the hardest part, it takes time and muscles. After sanding, wipe everything clean!!


Then I used a spray paint primer. I wanted the main part to be white and the back board to be gray. Forest green to white requires primer :)


Then I spray painted the backboard gray and used white house paint on the base. I did two coats on the backboard. I did 4 coats on the base- forest green to white, not easy. To finish it up, I nailed the backboard back onto the base.


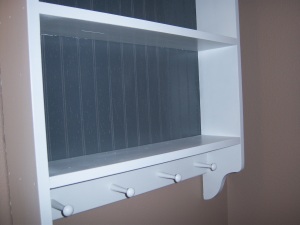
I decided to fill this empty space above the guest bathroom:


I painted this white and gray to match these awesome little signs my friend Eryn gave me from France. They are on each side of the mirror.


So that’s my guest bathroom! Hope it helps you use furniture you have to make it what you want!!

Letter Art

Standard

My friend Megan moved into a house a few weeks after we moved into our’s and her birthday is THIS week! To celebrate her wonderful life and her new house, I decided to make something for a very big blank space above her oven/stove.


To make this craft you will need:

-cardboard letters (you can get these at Hobby Lobby, Michael’s, or Joann’s- I found that Joann’s actually has the best variety of letters)

-paint of your color choice

-ribbon (color of  your choice)- or however else you want to hang the letters

-Clear water-resistant spray paint

-a paint brush

-a paper plate (or something to put the paint on :))

-hot glue gun

I set out the letters on newspaper and poured the paint onto the paper plate.


Now the hard part, paint the letters :) I did three coats of paint to make the red really pop.


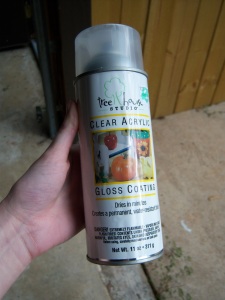
Once they were all painted, the color was very muted. Since it was going over a stove (where water will boil), I didn’t want the paint to get ruined. To prevent that, I spray painted the letters with a water-proof clear acrylic. It also made the letters glossy :) This is the brand I used:


This is the E with the top part spray painted with the clear gloss. You can tell what a great difference the glossy finish added to the letters. I’m really glad I chose the glossy finish!


You could hang these in many different ways. I chose to hot glue a ribbon to the back. Just make sure you make the ribbon length the same and placement the same so that the letters hang level.

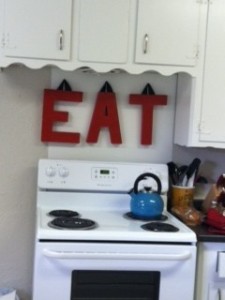
And here they are hung up in Meg’s kitchen!!! Happy birthday Megan!!!!

Be Strong and Courageous

Standard

This is my first post that is simply about my life and my faith… so bear with me.

I’ve had a lot of anxiety lately. I quit my job in August in order to pursue my teaching certificate. I signed up and was just about to get passionate about it when my husband and I decided to buy a house! Needless to say, my online classes were pushed to the back burner as I researched houses, looked at houses, dealt with loans, packed our apartment, moved our stuff (twice), and then began to get things in order in our new house. We moved into our house two weeks before we left for holiday madness: a week gone, a week home, a week gone, two weeks home, a week gone, home, and holiday done. With all that travel, I let myself put things off… including thinking about actually teaching.

As our lives have slowed down, I’ve come to realize how absolutely TERRIFIED I am to become a teacher. You see, I have quit everything I’ve ever truly loved because I would rather not try than fail at something that speaks to my whole heart. Even in college, I quit the education department knowing full well that I want to teach, I am made to teach, and I will make a great teacher. So I’ve lived my life in fear. I hide in my house, working SLOWLY on my teaching stuff, hoping that if I simply don’t finish, I’ll be able to continue hiding.

The only problem with hiding is that I hate it. My life has become dull and boring, not to much incredibly lazy. With my anxiety rising about finding a job, I’ve also had a hatred for myself (and life) rising from my lack of  stimulation during my days. It’s been a perfect storm to say the least. Last night I had a break down and realized that it was time I took this awful problem to the only one who can do anything about it (and who I’ve also been hiding from): my Jesus.

As I poured my heart out to my Lord, He took me to a verse that made me cry and cry. I began in Joshua 1. Joshua must have been scared too, because the guy he followed his entire life just died in Chapter 1. Now everyone (his entire nation) was looking at him, expecting him to do just as good of a job as Moses… No pressure there, Josh. But do you know what God says to him:

Be strong and courageous.

Do not be terrified; do not be discouraged,

for the LORD your God will be with you wherever you go.

Joshua 1:9

That hit me. God created Joshua to lead his people. He reminded Joshua here that He will never leave him or forsake him. God is so faithful, which is why Joshua could succeed. Not because of his own abilities but because the one who has his back is awesome and loyal and never forgets his promises.

I believe that I am made to teach. I get joy from it. I am passionate about it. I’m decent at explaining and inspiring. It’s time to stop being afraid of what God made me to be. I will be strong and courageous, because when I can’t do it, He can (and He’s not going anywhere).

Cute Jars

Standard

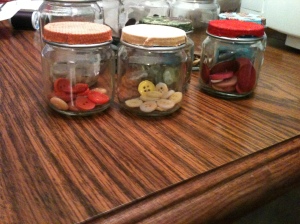
Another project I worked on over the Christmas holidays involved turning baby food jars into button storage for my friend Audrey!! For this project you will need:

-baby food jars (as many as you would like)

-different fabric squares (same number as jars)- about 2 1/2in. on each side

-your button collection (or whatever you’d like to put in here, beads would be great for this too!)

-Mod Podge and small brush

To begin, simply take one of your squares of fabric and one lid. Cut diagonally towards the center at each corner of your square, just about a 1/2in or less. Cover the top and sides of lid with Mod Podge. DO NOT go to the inside of your lid or you won’t be able to screw the lid onto the jar. Place the center of the fabric on the center of the lid. Fold the fabric around the edges of the lid and secure with more Mod Podge as needed. Let them dry for about 20-30min (depending on how thick you applied your glue) and trim off the excess with scissors or an exacto knife.

Sort your buttons by color (or whatever your preference) and place into individual jars. Match lids to corresponding colors and voila!!! You now have incredibly cute button storage and can quickly locate the button color of your choice :)

Crafty Christmas

Standard

First off, I have a major laugh-at-myself-moment. I misspelled abundant in my blog title… awesome. A true friend had the guts to tell me, so thank you dear friend. And please, laugh at me, I deserve it. (And will try to fix it post haste… we’ll see how that goes.) I am also notoriously known in my family for my misspelling mishaps.

Next on the list, Christmas is over which means I can post about the things that were made for Christmas!!!! I’d like to begin with a project that I assisted my friend Abby in making! It’s a twine covered letter with felt rosettes.

To make this you will need:

-One wooden/cardboard letter (we bought two and glued them together to make it thicker)

-Thick twine

-Felt (colors of your choice for the rosettes)

-Pearl beads

-Velcro strips (if you want to be able to change out your rosettes)

-Ribbon (color of your choice)

-Hot glue gun and LOTS of the glue sticks

To begin, wrap your letter in twine. Pick the direction you want and use the hot glue every inch or so, especially along the back where it won’t show. The sides are a little tricky and will require you to cut pieces (or wrap carefully) and glue them individually.

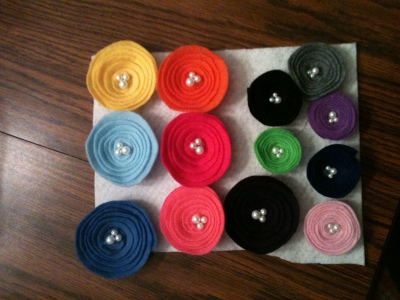
Then create your felt rosettes. We decided to make rosette in lots of colors for every season in two different sizes!! You may choose to only make two and simply glue them straight onto the letter (and you won’t need velcro).

To make a rosette, cut out a circle in the felt to your desired size. We made it a circle with about a 3 1/2in. diameter (for the big one). Cut a spiral in towards the middle, making the spiral about a 1/4in thick. Then wrap starting in the middle of the spiral, using the hot glue gun to glue it along the bottom. We then glued velcro on the bottom/back and glued three differing sizes of pearl beads into the middle. The rosettes can be changed out whenever to whichever color you want!!!

To make it hang, we simply made two loops with the twine. The loops were caught up along the letter and then glued into place. We tied a loop of ribbon between the two twine loops, letting the bow hang at the side. This method would have to change depending on which letter you use.

So that is the twine letter!! Thank you so much for Abby and Audrey for crafting with me and sharing your pictures!! More to come!!

New Beginnings- a Dread Transformation

Standard

As it is a new year, I would like to share a story of new beginnings. See, I have this amazing little sister named Caren. She is so incredibly wonderful, funny, kind, brilliant, and is one of my all time favorite people. After she graduated from high school in 2010, she took a year off of school to serve other people through the YWAM (youth with a mission) program- http://www.ywam.org/. She spent 6 months living in Brisbane Australia and 1 month in northern India and Nepal. While there, she decided to go for a long desired dream of having dread locks :) So my blond haired sister got dreads at the end of 2010. This Christmas however, for many reasons, she wanted to get rid of them… and save her hair from being shaved. As an entire family we set to work not knowing if anything could possibly be saved.

Here are her dreads. She left her bangs out of the locks, so you can see that hair pinned back. Because her hair isn’t curly, her dreads were formed by rolling and crocheting her hair- basically tangling it into massive rats. She didn’t want a  lot of product, so she used minimum wax.


We bought a bottle of conditioner, a bottle of detangling spray, and a set of 20 combs to begin. Then we set to work spraying each individual dread and working it out with a comb. It was a good thing we had so many combs because they kept breaking!!!


It was literally an ENTIRE family affair. No one escaped their time combing out the dreads… Not even my Dad :) ((Or brother, husband, sister-in-law, mother, and cousin))


She has 103 dread locks. It took us almost 13 hours with 3-4 people working at all times to get them all out. Her hair was extremely damaged and long!  And I felt so bad for her scalp which was soo soo sore. Because she would crochet new hair into the dreads, she pretty much didn’t shed the whole year. So as we combed, we pulled out a ton… Maybe not a ton, but a whole bag full!


Yes, this is the bag full of hair.


She went to get her hair cut after a long shower :) She had the salon also give her a deep conditioning treatment. But it was totally worth all the hard work, because her new hair cut is so GREAT!!!!


AHHHH!!! I think she’s the most beautiful person I’ve ever known. She was gorgeous with dreads and is gorgeous with no dreads. She’s one of those people who looks beautiful no matter what!


Her courage to try something new is inspiring to me. It’s a new phase in her life (she’s now a freshman in college) and a new year. While is it sad to move on from things we love in the past, it is important to remember the exciting, wonderful things God has in store for us ahead. I’m also in a new phase in my life, adulthood. It’s time to embrace the blessings and challenges God has for me and move courageously into 2012!